Tuesday 28 June 2016

My French Napolionic army defeated followed by England's exit from the euros

On the same day that England's football team put in a pity full performance (yet again) to be sent home from the euros early (yet again) I  managed to get a game of Blucher in against my dad using our French and Austrain armies which as with the football, ended in defeat for my French (Although I put up much more spirited performance). The game had started promising for my French as I launched a large attack against my dads right flank with my 1st Corp and managed to drive the defending Austrain troops from the hill and even cause a lot of damage onto the second line of Austrains. However this is where my attack ran out of steam and ground to a halt as I was, on reflection far to cautious in committing my second Corp and heavy cavalry who I deployed rather poorly to be fair. Had I grasped the small opportunity I had and attacked with more troops I feel I could have broken the Austrain army. Another mistake I made was not engaging the Austrain  left flank, I elected to task my Saxon Corp to just hold the flank, when my dad realised I was simply just defending, he moved his infantry over unopposed to assist with the main battle on the right flank and centre, leaving some cavalry brigades to hassle my Saxons. This action from my dad really swung the game in his favour and ultimately my French army was broken late in the day. I really should have committed the Saxon brigades into action against the Austrain left, although I knew I wouldn't beat them and would probably lose the Saxons I would have at least kept the Austrain flank pinned. But the main problem I have playing Blucher is how to use my cavalry effectively, I just can't seem to get the balance right when to and not to attack. Again in this game my dad used his cavalry to good effect launching a well timed counter attack while my heavy cavalry brigades only really had sporadic sucess far to late in the game, really to far out of the action to change the result of ne game. However despite having plenty to think about in Napolionic warfare tactics I still fully enjoyed the game and although my army was in a beaten position for much of   Later stages of the game I still tried to take the game to my dad and came very close to breaking the somewhat battered Austrain army, some rather lacklustre dice rolling in the combat from yours truely in the last couple of turns ended any hope of a unlikely victory. Here are some photos of the action...

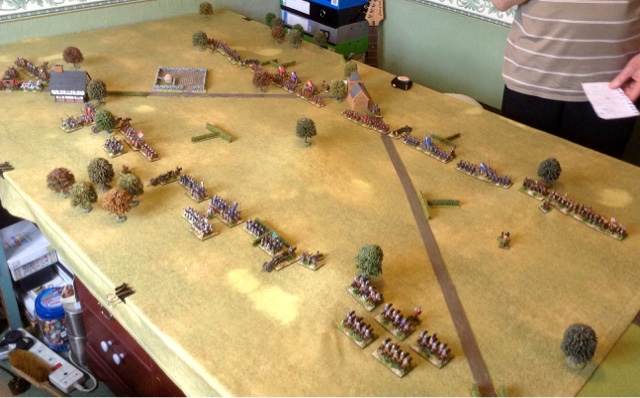
The French 1st Corp advances against the Austrian right flank
The Austrain infantry awaits the attack volumes of the French
The French 1st corps launches its assault onto the Austrain held hill
The French heavy cavalry Corp have little success against the prepared Austrain infantry
Part of the austrain II Corp supported by artillery advance towards the Saxon infantry
The French I Corp take the hill from the reeling Austrains as the Austrain commander commits his reserve cavalry in the form of Currasiers 
Austrain Dragoons and Hussars on the gallop move across the Saxon lines
How the battlefield looked at dinner time 
The Austrain view of the French I Corp attack on the hill
As the Draggons and hussars move across to the centre a brigade of Austrain Grenzer move in support
French Currasiers intercept the hussars/Ulans from there flanking move
The last real attack late in the battle by the French see's the brigades of the II Corp counter charged by the reserve Austrain infantry who halt the attack
The final assault by the French cavalry is launched against the prepared positions of the battered Austrain infantry who had seen off the attack of the French II Corp 
The Austrain squares hold firm and the routing of the French Dragoons see's the Austrains victorious.
The battlefield at the end of the game, the battlefield a lot more sparse than when it started.

Sunday 26 June 2016

Terminated but I'll be back....


One of my presents for my 40th birthday was the Terminator Genisys game, so after a few weeks reading the rules I had a bash at it tonight. The game played very easily and after a couple of turns I was hardly referring to the rule book, quite simple really which is good for a board game to fill a hour or two up on a evening. I played the humans in a hold the objectives scenario that didn't go the full length of the game as I was 'terminated very quickly' by my partner Catherine who I can't recall missing a single shot when it came to her dice rolling, where my dice rolling was laughable. Still it was a good fun introduction to the game..


Friday 24 June 2016

GLORY HALLELUJAH

This week saw us turn our attention to the ACW as we were keen to try our hand at the new Warlord games supplement GLORY HALLELUJAH for black powder rules. My dad had been previously using rank and file rules but felt this supplement with all the amendments to the Blackpowder rules would show a good reflection of fighting the ACW period. 

The confederate centre moves hastly towards the central objectives of the farm land
Union infantry and artillery on the March 
The Texas brigade engages in a fierce fire fight over the farm area
More rebels advance towards the fighting in the centre
Massed ranks of Blue uniforms form line behind the picket fences
Out flanked and under heavy fire a rebel regiment has enough and breaks
The 'Oldie' rebel brigade hold the right flank reluctant to engage at close quarters 
Neither side wants to give ground over the centre of the battlefield as the fire fight intensifies 
The union 3rd brigade attacks hard on the right centre of the confederate centre as it starts to waver
The iron brigade advance through the fields as the confederate right flank reels in the face of the fire power
Urged forward by the brigadier and 'Rebel yell' a union regiment is out flanked and broken 
The fight over the farm land hangs in the balance as the rebel troops move to point blank range to use there smoothball to maximum effect to dislodge the stubborn Union defenders
The tough Texan brigade charges over the fences and drives back the union defenders 
A union counter attack sees the rebel attack crumble on the left of centre as the brigade is broken
Artillery fire supports the wavering old brigade of rebels who are desperately hanging on to the right flank

The game played out really well with the new additions to the rules changing the feel from a regular Blackpowder game. The withered rule was particularly different as troops who failed a break test from shooting are not removed from play, instead they give ground,unless they are behind a denfensive position were they can remain, this happened a couple of times with my dad and it proved to be important in the union holding the right centre farm objective. as the Confederate player I just about managed to hang for a draw, my Texan brigade were excellent throughout the game and with their new rules they will prove a very tough brigade to break. The morning session was all my dads as I really struggled with commands rolls and hitting anything with firing, however after dinner my luck changed and I managed to fight my way back into the game. The new rules make it a difficult thing to charge (unless your Texans) with all the minus factors to your command roll so you are encouraged to fire fight which gives the feel of a ACW battle, and also on a few occasions in this battle,encourages you to use the follow me rule (you can imagine your brigadier riding in front of his men, hat in his hand waving above his head encouraging his boys forward) Even interpentrating your troops is not as straight forward as in the main Blackpowder rules giving you something extra to ponder. Overall a thumbs up from me and a very enjoyable game.

The end positions:
The left centre was held by the union as my rebel brigade had broken and was in full retreat
The Texans held the centre after breaking two brigades of unions in the battle over the farms
The right flank of the rebel just about holds the union attack
And a picture of some wagons :-)

The supplement we used, well worth the investment for Blackpowder ACW games with loads of historical scenarios included


Wednesday 8 June 2016

A happy day to be a Royalist..ECW AAR


This weeks game saw us use my dads recently rebased 15mm ECW armies using Pike and Shotte rules. I decided to be a royalist and picked a army consisting of 4 brigades, two of these were cavalry brigades and two infantry, one of the infantry brigades was led by Hopton which made the pikemen stubborn and tough fighters. My dads parliament army was a mirror image of mine with Cromwell leading a cavalry brigade which included two regiments of Ironsides. Our troops were deployed using maps although we both opted for a classic deployment of infantry in the centre and cavalry on both flanks. My aim was to sweep both cavalry brigades away with my cavalry while Hoptons brigade was to engage the parliament centre, my second infantry brigade was to hold the flank after advancing in support of Hoptons pike, well command rolls permitting as you never know in pike and Shotte.

The two armies on deployment

Roundhead infantry brigade, I love the purple coats,(Brooke's regiment I think?)one of my favourite units in the army.

My cavalry brigade on the right flank, this was made up of five galloper units. However their attack was to be short lived as they proved to be no match for Cromwell and his Ironsides as they became the first brigade to be broken 

I managed to grab the inititive at the start of the game and was able to get Hoptons Cornish brigade (my dad doesn't have the correct regiments for the Cornish brigade so we used what was available) onto the hill in the centre of The table denying the defensive ground to my dad.

My second royalist infantry brigade advanced in support of Hopton and in the cover of the hedge rows and walled field set a strong defensive line. My cavalry on my left flank faired better than my gallopers as they broke the Roundhead cavalry  after a couple rounds of combat. Twice my dad failed charge orders with his cavalry when he was in a position to exploit my cavalry and ultimately this led to their downfall.

The first of Hoptons pike get stuck into melle, eventually shaking the Roundhead pike.

After a couple of rounds of rather ineffective muskets fire my dad charged with all of his pike against my second infantry brigade. The overall charge failed and two of the three pike units ended up been repelled and shaken, the difference in morale saves was startling as my dad pretty much failed everyone.

Despite having the hill I decided to charge with another regiment of pike and musket from Hoptons brigade. Eventually I managed to cause enough units to become shaken and broken to break the centre infantry brigade of the Roundheads. The stubborn and tough fighter reroll were to play a big part in this outcome.

After pursuing the broken royalist cavalry, Cromwell leads his cavalry onto the flank of my infantry brigade in one last throw of the dice to break Hoptons brigade as my dads army was very close to losing his final infantry brigade,which would mean the army was broken

The end is nigh as my dads infantry brigade is one unit from been broken, he desperately tried to rally some morale points off his musket regiments but I was able to keep inflicting the casualties back on to them from my own musket and cannon fire.

Despite my musket regiment heroically withstanding the Ironsides charge for a couple of turns my pike weren't so lucky as a follow me order saw Cromwell lead his Currasiers over three moves smack into the flank of a regiment of Hoptons pike, when these broke I had lost Hoptons brigade as they became broken. I was two brigades down now.

However the game came to a close when a unit of pike became shaken and a musket regiment broke under heavy fire from my musket and cannon fire, breaking my dads final  infantry brigade meaning he had lost three of his four brigades and breaking his army.

Victory for the Royalists but it had come at a cost in a hard fought win. It was a excellent game with the Pike and Shotte rules playing out some rather entertaining moments with a few blunder rolls here and there stoping our battle plans in their tracks, and a few rather amazing morale saves from me,no more so than when one of my musket regiment saved all 6 hits when beating my dads charging pike unit! Heroic stuff indeed 😄 
up next should see us playing a Blackpowder ACW game using the new supplement warlord games have recently released.

The final positions