Wednesday 27 July 2016

Painting update


I've been very fortunate in my time in wargaming to have basically every army ive collected painted by my dad 😄 and not just that but to a excellent standard to! So to be honest the painting side of the hobby has never really appealed to me, especially since I started a family 5 years ago as spare time is in very short supply when coupled with working a full time job and I would much rather play a wargame in my spare hours over the weekend! So recently After I dug out a couple of M26 Pershing Heavy Tank / Medium Tank (1945) and German half tracks i glued up sometime ago and then neglected I thought what the hell why don't I have ago at painting them, so I bought myself some paints and scrounged some brushes off my dad and set about painting them, just doing a bit each night over the course of approximately an hour. I must admit I repainted the half track a fair few times as I was never happy with the way it looked but eventually I got somewhere that I was fairly happy with and the Pershing I felt I handled pretty well, I added some extra stowage to the models and some foliage and transfers and the end result I must admit I was very pleased with. For a first go at painting this kind of model I think I did alright, I've got a couple of Russian heavy tanks under coated up ready to be painted, hopefully it won't take a couple of years or so to get them completed..time will tell!

I painted the tracks and underneath of the tank in a rusty effect to highlight a weathered look to the tank and also added the stowage onto the tank
As well as the stowage I also added some foliage onto this Pershing 

The German Sd.Kfz. 251/10 - Schützenpanzerwagen (3.7 cm PaK). Equipped with a 37 mm Pak 36 anti-tank gun mount, I added plenty of foliage to, to really give it a camouflaged look, ideal for fighting the Normandy theatre of the war
Also I added various pieces of stowage to the halftrack
I have a feeling it will need all of its camouflage if it finds itself running into one the M26 Pershing tanks during a game!


What? Yet another rule set.....

This weeks game saw us play a small WW2 with around 500 point(ish) aside using the Iron cross rules for the first time. I have been keen to play test these rules as we have had them for some months now without playing a game with them, also my WW2 armies having been gathering dust as we have been busy wargaming other periods and various different rule sets of Late and the WW2 gaming had been placed on the back burner somewhat., so I hoped that the rules might help rekindle my excitement in gaming the WW2 period.

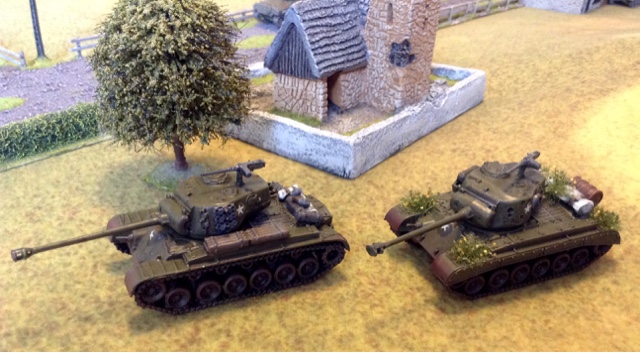
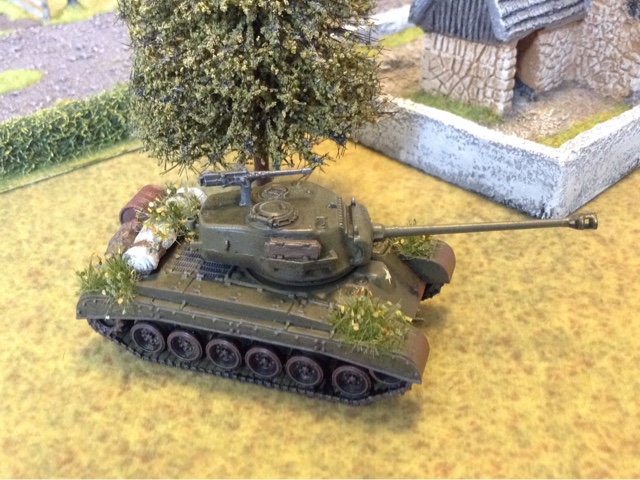
American 75mm Shermans and infantry detachments advance cautiously down the road.
Panzer IV Tanks at the ready for the advancing American armour
Grenadiers and panzershreck team occupy the ruined building 
American Infantry Rush towards the church to seek cover

I kept the forces small and simple with both armies almost a carbon copy of each other with a mixture of a few tanks and infantry squads with support teams. We played the engagement scenario from tne book, both my dad and I lost a unit from reserves as they became lost on their way to the battlefield, I quite liked this rule as it means your not guaranteed any of your reserves will arrive, on a bad day rolling the dice you might find you don't get any of your reserves which would be a major blow to your battle plans. So the rules themselves, did we enjoy them? The answer to that is yes definetly. Once you get to grips with the activation and reaction command phase it really opened up a tactical game with lots of possibilities. The rules are for the most part really straight forward, we got stuck on a couple of issues regarding tank damage ( this since has been sorted out) and made a couple of mistakes as we forgot a couple of the rules e.g infantry not penalised for moving and firing, that aside we managed to complete the game and I managed to grab a victory with the Americans.  I particularly liked the fact that tanks operating too close to enemy infantry unsupported by your own infantry were penalised when firing and moving, all to often infantry have played only a small part in games we have played with previous rules sets, in Iron cross they have a purpose and can be a major threat to isolated tanks. The firing system was all based around a D10 and a D6, in this game I never rolled more than two at a time (a vast difference from our flames of war days). With only a small chart to check when determining pluses and minuses to the diice score, this made for a swift turn sequence. 
The panzer IV's are both knocked out by reaction moves from the American tanks
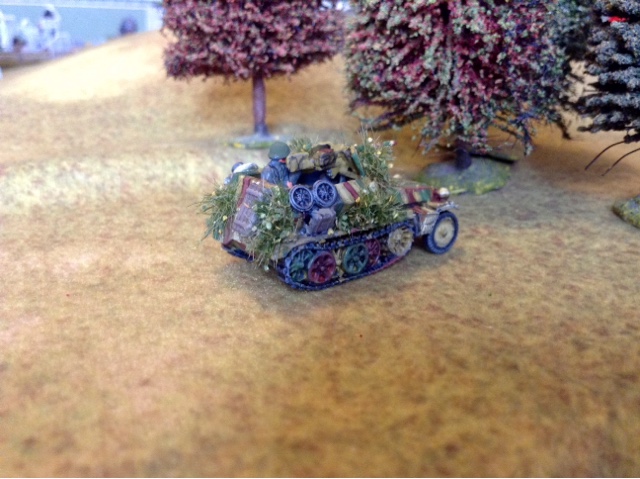
The M5 hides behind the ruined building after a flank shot blew up the remaining panzer IV, 
A Pak 40 well hidden awaits the US armours advance along the road 
The lead Sherman becomes the victim of the Pak40 with its first shot.
A Marder III M lurks behind tne hill line
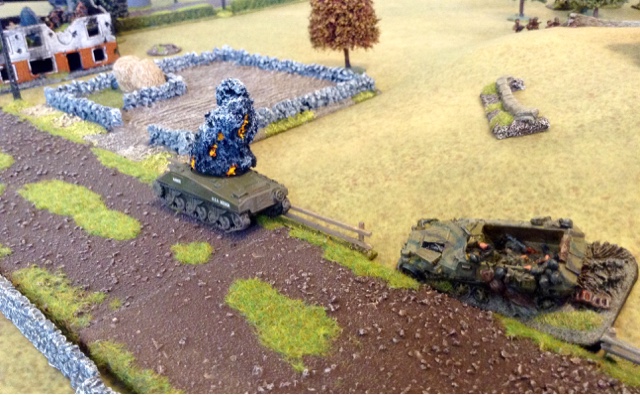
American infantry and 76mm Anti tank gun cover the road
An American Tank hunter and Jumbo engage the distant German Stug and Panzer III 
The Stug IV G is destroyed by the M10 taking the Germans over their breakpoint
How the battlefield looked.

I'm really looking forward to having another game with Iron Cross using a larger force, probably twice the size as this game, now I have a understanding of how the rules work. They definitely suited my dad s taste as they were a quick moving set of rules without been bogged down with too much detail (all though he does like battlegroup he finds them somewhat 'clunky', which i understand.) and although they don't go into major detail i.e. seperating different tanks etc, e.g Panzer III M/N/E all have the same stat line,and there is no off table artillery strikes or airplane attacks  it didn't take the feel away from the period we were gaming and certainly didn't make any difference to my dad or I. So in a nutshell thumbs up from us both and definetly wet my appetite to play some more WW2 games.

Saturday 9 July 2016

X wing game night, Empire raid....


We ran a game of X wing last night so I got a first chance to use my latest addition to my expanding fleet in the form of the Hounds tooth. I used the Raid scenario from the core set so we both had 100points aside give or take a couple of points here and there. My partner Catherine (who has been a willing?? Starwars gaming companion for me) kindly give me the roll as the attacker. With my attack squadron consisting of Bossk piloting the Hound's tooth with a few up grades, a Obsidian and Academy piloted  tie fighters and Soontir fel with elusiveness upgrade flying the tie interceptor I simply had to capture the 5 satellites across the gaming table in 8 turns or destroy the rebel fighters, easy right? Catherine had chewie and Luke Skywalker in the Millennium falcon with upgrades and two rookie X wing equiped with torpedos and R2 units.

The Hounds tooth, a really nice ship from the scum and villainy range.
The rookie X wing pilot wastes no time in engaging Bossk in the hounds tooth
I think the rebels had a grudge against Bossk as the falcon engaged the hounds tooth which quickly found its shields destroyed, although it did manage to capture a satellite.
A tie fighter outmanuvers the X wing as it becomes stressed closing in on capturing the satellite Just front of it.
The falcon turns its attentions to the tie interceptor who quickly escapes the Falcons presence and captures a third satellite.
The fighters try to out manovere their enemies
Bossk's debut ends as the hound is shot down by the pursuing rookie X wing who's shooting has to be said was remarkably accurate! 
After clinching the fourth satellite the Obsidian squad pilot made a dash for the final satellite  coming to with in one move of claiming victory, although out running the falcon the tie fighters last hit point was taken, after surviving the first attack by the X wing, it's wing man made no mistake sending the tie fighter spinning deep into space.

I made one last desperate attempt to reach the objective with my remaining tie interceptor in the final three moves available but unfortunately it was just to far away from the remaining satellite to out manovere the rebel fighters and with only one hit remaining the interceptor was easily shot down as it approached the rebel fighters who has covered the path to the satellite. Three attack dice from a X wing fighter all hit and all my Four defensive dice rolled a blank so that was that! It was such a close run game and I would have won it if I hadn't made a couple of silly manoeuvre mistakes early in the game and with a little bit more luck on some of my defensive dice. As it was the Rebel force, bruised but still completely intact had just about managed to keep the vital satellite communications open, great fun!

The victorious rebel squad fly back to base

Tuesday 5 July 2016

Carthaginian and Roman republican clash

This weeks game saw us return to hail Caesar rules to have a ancient game using my dads Carthaginians and Republican Romans. I decided to use the Carthaginians and grouped my men in three divisions, cavalry on the rught, main body of veteran Spearmen with supports in the centre and over on the left was the Lybian Spearmen division with supports. My dad opted for a cavalry division which was facing off against mine, the centre was a massive division of Roman infantry and his right flank was held by a division of spainish allies. 

The battle lines drawn up
Velites, Hastati,and Principes form a formidable centre division
My Lybian Spearmen with supporting elephants and Gauls advance towards the Spanish infantry who had reached the hill line first after my CnC had blundered attempting a move!
The Roman Velites quickly dispatch the Carthaginian skirmishes shielding the main body of veteran Spearmen.
Both cavalry divisions close ready to charge.
Early action sees the Lybian Spearmen and citizen Spearmen somewhat surprisingly beat and shake the Triarii units.
The Roman Velite units reform their line leaving my Carthaginians little choice but to charge them.
Despite fresh Roman Principles joining the melee the Lybian and citizen Spearmen still win the melee 
Finally the Veteran Spearmen break through the first line of the Roman centre.
The cavalry clash as both division leaders join in the melee
My left flank performs very well and drives the Spanish troops back from the hill shaken as the presence of the elephant proves to much for their nerves
Along the centre the veteran Spearmen and elephants clash with the Roman Principes and supporting Hastati 
My dads right flank is broken and the remains of the division is forced to withdraw from the field, my Lybian Spearmen division now turns ready to launch a flank attack onto the Roman centre
The centre combat sees a bag of mixed results as both sides are forced back in disorder to regroup as a the elephant is broken fire failing its stampede test.
The Roman centre starts to thin out as the Principies start to break from the veteran Spearmen although the Romans do break the Gauls on the righ centre leading to the possibility of been able to turn the Carthaginians centre.
Despite having the upper hand in the game we ran out of time and I was unable to break my dads Roman Republic morale. I had won the battle on the right flank by breaking the opposite Spainish division and had started to get my troops into a position to seriously threaten the Roman centre. Both our cavalry divisions were a spent force from fighting each other throughout the game, my dads was one unit from been a broken division where mine was mostly shaken units. The centre was still very in the balance with both sides still having plenty of fighting troops ready to get stuck in, so the game we decided was a winning draw to the Carthaginians, as we both felt if the game continued the Carthaginians were likely to win. It was a good battle, we didn't wait round to long to get stuck into each other so there was plenty of action throughout the game. The rules played well again, we had a couple of sticking points during the game especially with using small units for the most part in the Roman army regarding when supporting in a combat but I think we have cleared this up since. We also forgot a few special rules during the game for certain units but to be fair we have been using a lot of different rule sets lately to remember everything. However I still think Hail Caesar allows for a good ancient game and I think they are my preferred rule set after trying different ones recently. Good stuff 😄