Tuesday 28 July 2015

Victoire pour la grandiose armee......

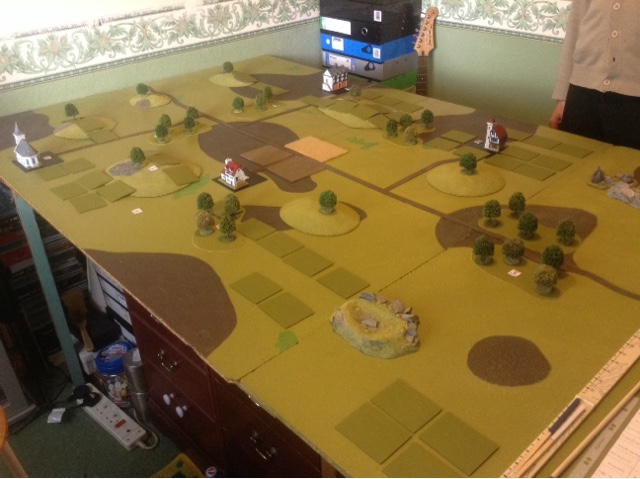
With the Blucher bug taking full effect we had to run another game last weekend. We played a scenario from the internet where my Dads Austrians were defending against a French attack played by me. I had a slightly larger force but the terrain was more favourable for tne Austrians. There were two main objectives I had to capture for a complete victory or as per the rules if you could break your opponents army rating. After a full afternoon of gaming I managed to break the Austrians after capturing one of those objectives. It was a real tough slog to achieve the result and my cavarly Corp took a right battering from their Austrian counterparts. However my Guard Corp proved their metal in destroying the Austrian force defending the left hand side objective behind the stream and capturing it. In the middle of the battlefield both armies inflicted heavy casualties on each other in some fierce fire fighting and H/H combat. However I was able to pick off a few retreating Austrian brigades with my light cavalry pushing the Austrians past their break point, forcing them to retire from the field. We both managed to lose a our Sub commanders who while leading from the front managed to be one wounded and had to retire from the battlefield. Another fun filled exciting game with these excellent rules, here are some action shots,

The Guard Corp on the advance through the woods

The Austrian line Infantry ready themselves for the Guards attack. A lucky shot from my Guards artillery saw the Austrian guns forced to retire before they had even managed a shot, this proved to be a big loss for the Austrians.

The Main body of French infantry push forward in the centre towards The hill line defended by the Austrians, Awaiting behind to hill is a large presence of concealed units.

The first corps attack is repelled although it does make in roads against the Austrian infantry corp. at this stage I activate my Heavy cavalry corp who charge upon tne unprepared infantry and ride them down.

Close range volley fire and canister fire starts to take its toll

The Guard start to get the upper hand in tne skirmish fire and weaken the Austrians enough to ready for the Bayonet charge

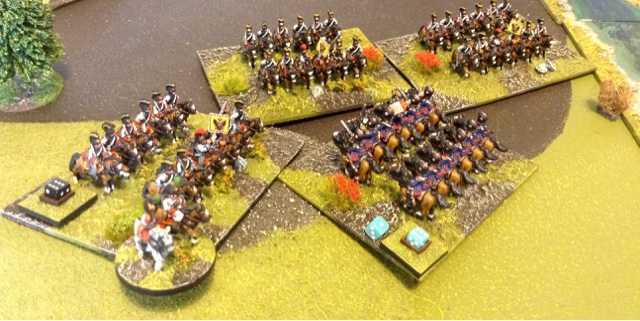
The French Dragoons take the fight to the Ulhans and push the Sustrian cavalry back from threatening  the French infantrymen flanks in tne centre 

Tne Austrian reserve corps reveal themselves and tne Austrian Currasiers charge into the French Currasiers while behind The hill the Austrian Guard corp take the place of the wavering Line infantry.

The Guard cavalry charge the Austrian infantry brigade who have a torrid time from the Guard artillery. Unprepared and heavy casualties made this a one sided combat round.

Been at risk while rallying my infantry my sub commander had to test to see if he became a casualty....on a roll of a six........he was removed from play

The Guard crash home into combat and drive the Austrian defenders back from tne stream Howard's to objective in tne farm area.

After riding down the Austrian infantry and pushing back a brigade of Currasiers the Guard cavalry are over realmed and routed by the remaining Austrian Currasiers although the attached Austrian sub commander becomes a casualty leading the charge.

The Austrian Guard brigades start to push the 2nd French infantry corp back with a fierce counter attack.

A clash between the light cavalry sees the Austrains come out on top forcing tne Zfrench cavalry to retreat.

The Guard continue to push forward as to Austrian infantry break around tne objective leaving it in French control.

 French light cavalry retreating from the combat 

However a brigade of Light cavalry manAges to catch and ride down a retreating Austrian infantry brigade.

The final actions of The game saw the Austrian Currasiers beat and force the French heavy cavalry to retreat heavily depleted, but the loss of a Guard brigade who were caught in flank by two French brigades saw tne Austrian morale broken.

My French force had proved victorious late in the day as tne remaining Austrians retired from the battlefield.

The French army on the March in pursuit of  the retreating Austrian army, Viva Le France...... Well at least for this day anyhow :) 


Tuesday 14 July 2015

French v Austrian Blucher rules game


We trialled a second Napolionic game on Sunday using our new choice of rules Blucher. My dad has been super busy rebasing both of our forces over the last couple of weeks and it definetly helped the visual look of the game with both armies looking really nice. The game didn't play out to well for me this time round as my dad had a habit of rolling poor command points for me, on average I would say I was getting 6-7 movement points per turn out of a possible 18 (I'm sure he was using D3's) where as I was rolling no less than 12 movement points at least for my dads Austrians. This played serious havoc with my battle plan as I lost my cohesion of my force and my troops started to become isolated as I was unable to push forward with my reserve troops. My dad utilised his cavalry well at this point and caught a couple of my French infantry divisions when they were badly shot up and were slowly retreating away from the front line the infantry were unable to put up much resistance. I did have sucess with the French and was pushing hard to break the Austrian left flank breaking a couple of divisions and silencing a battery, however with my guard division not getting the orders to advance in support of this attack it petered out despite a large presence of French light cavalry on the Austrian flank. A great game again and this Friday I'll be ordering my own copy of the rules, The Austrians took victory in the game, next time we are going to run one of the scenarios from the book in which the French are the attackers. Here are some pictures of the game unfolding.

The set up, all the units start the game concealed/hidden from your opponent until they are activated or become within 4base widths of the enemy.

The french first corp march on the Austrian left wing. The French artillery start to target one of the Austrian infantry divisions.

The Second French corps are taken by surprise from the Austrain Dragoons and hussars, although they manage to fend off the attack with little in the way of casualties. The Dragoons suffer and are routed from the supporting French artillery battery.

The first line of Austrians defending the hill line are activated.

On they come in the same old way, two French columns advance under the cover of their skirmishes

With my attack in full flow I activated a reserve move onto the light cavalry division who make a bee line around the wooded area to threaten the Austrian flank.

The French attack falters on the the Austrian left flank thanks to some fierce artillery fire onto the French  line infantry, forcing a unit to retreat from the front line.

With loses starting to take their toll the French charge into H/H combat  forcing the Austrians to retreat.

After suffering heavy accurate fire from the Austrian gunners a unit of French line infantry despite been prepared are easy pickings for the Austrian Currasiers and rout.

With the Austrian infantry retiring from the Left flank hill line the French Dragoons arrive from the reserves and charge the battery which is low on ammo

The old Guard defend the ridge of the major objective awaiting some orders of which never came.

With my 2nd Corp of line infantry still threatened by the Currasiers and in prepared positions the Austrain infantry charge into them but the french infantry hold.

The last move I made with the French was to charge the Austrian infantry in the rear. Despite this advantage of been able to re roll all missed combat dice I lost the Melee and was forced to retreat.


Wednesday 8 July 2015

Action in the desert 1885

                                             "A trip down the Nile"


On Sunday we managed to get a second outing with my Sudan forces onto the table. We played alittle scenario where the British force split into two columns had to relieve the town held by a small Eygptian force which was under attack from a Mahdist force. The British columns would appear at random points on the table to represent the fact that they had been separated due to sand storms on their march to the town and the Mahdist reserves would enter at random points on tne table aswell each turn. A little extra we added to the game was if a one was rolled at the start of the turn a sand storm would occur during tne subsequent turn meaning movement would be halved as would shooting ranges and command distance. I tried my hand with the British this time round and my dad had the task of uniting the Mahdist force to try and cause an upset again.

The Eygptian garrison protecting the steamer which has stopped for supplies.

The opening moves of the battle saw the first British column enter from the far right table edge and the Mahdist cavalry brigade and Dervish infantry enter on the opposite side.

Lots of Fuzzies of the green flag move behind the cover of the hill

Mahdist cavalry enter the table but struggle with command rolls from this point on for most of the game.

The Guard Cammel and 21st lancers scout ahead of the column

The second British column enters the table right between the Dervish Warbands and Mahdist cavalry, but some good command rolls sees me able to deploy all this brigade where I wanted them ready to open fire, there first volley with the artillery support sees a Warband become disordered and shaken.

Mahdist infantry enter the table as the first British relief column tries to move more towards the centre of the table to link up with the 2nd column but progress is slow as the command rolls only see the column moving at one move a turn.

Mahdist camels and yet more Fuzzy Wuzzie Warbands join the attack on the British.

The first real action sees the Dervish Warbands charge the formed lines of the kings royal rifles and the   Gordon's  battalions. The Gordon's failed to stem the charge with fire power but hold their ground in the melee but the Kings royal rifles unleash a devastating volley which sees the dervish Warband shaken and routed.

The 10th Hussars charge the flank of a Mahdist cavalry unit (we play an home rule amendment which means to counter charge you need to pass a command roll, it's not automatic). However not wanting to be left out of the action the 19th Hussars blunder their roll and end up charging into a supporting position of the 10th Hussars, who in the following combat phase make short work of the Mahdist cavalry breaking and shaking them and then a sweeping advance move contacts a second Mahdist cavarly unit who in turn become shaken.  

The other British column sees the Royal Marines battalion become somewhat isolated as it covers the rear of the British column advancing for the town. The screaming Warbands sees the British troops retreat away from the combat as a second Warband threatens the Marines flank.

After scouting ahead the camel Guard unit finds the Mahdist camelry who blunder there command roll and end up charging into the guard unit, although the guard hold there ground thanks to their steady rule they become shaken.

The 10th Hussars fresh from their early sucess  counter charge a unit of armoured Mahdist cavalry. Despite both sides inflicting serious hits both our saving rolls were excellent and every single hit was saved leading to a stalemate between these two evenly matched troops.

After withstanding further attacks the Guard are finally broken when the Mahdist camels do a follow me order and charge into the Shaken dismounted Britsh who break.

The mayhem on the battlefield as a sand storm blows across the dessert which hammpers my 2nd British coloums advance on the town as the Fuzzy Warband brigade is broken and forced to retreat.

Still not content with everything they have achieved so far the 10th Hussars charge into a unit of Mahdists who they dispatch with ease.

The 21st lancers move towards the Blackwatch battalion who are involved in hand to hand combat with a dervish Warband who survived and held their nerve over coming the British closing fire. 

The Kings rifles fail their break test when charged by Mahdist riflemen but luckily get out of harms way as they are already shaken, the British CnC in response turns the Gordon's and the artillery onto the rifle men but all their shots miss!

The Navel batallion preform much better and shake the Mahdist Warband breaking another Mahdist brigade. 

The Eygptians lend their fire against any Mahdist troops who stray to close to the walls of the town.

The Lancaster & Yorkshire positions itself ready to engage any adventurous Mahdist camalery who have taken shelter behind the sand dunes.

Sensing an opportunity my dad orders a follow me with a unit of camels And go in the flank of the already engaged Blackwatch. These extra attacks prove to much for the brave scots who turn heels and flee, the 1st British column had become broken.

With one last crack at winning the game my dad threw his armoured cavalry against the British hussars, but they were no match for the British cavalry in this melee and as a result they were broken meaning the Mahdist cavalry brigade was now a spent force, at this point the Mahdist army was now broken.

The 2nd British coloum forms a solid gun line as the Mahdist infantry begin their retreat.

The end of the game, the second British column now have an unobstructed path to the town were they are free to relieve the Eygptian troops and travel futher down river on the awaiting steamer.

It was Another fun game in the desert using the Sudan period. My dads poor Mahdists turned out to be quite a unruly mob and didn't care to much to .listening to orders although they did have sucess in different periods of the game. My British troops on occasions showed how deadly their fire power can be against the Warbands of Tne Mahdists tribes but the true heroes of the day were the British hussar units who swept away anyone who stood in front of them. A British victory but if did come at a cost with the loss of some of the British Finest battalions.